Orphaned VM State :-
What is an Orphaned VM, let’s find the reason of orphan virtual machines.
In VirtualCenter under very rare circumstances, you may find that you have a virtual machine that has an orphan designation. An orphan virtual machine is one that VirtualCenter discovered previously, but currently is not able to identify the associated host.
Launch Virtual Center or Virtual Client
Right click on the orphaned virtual machine
Select ‘Remove from Inventory’
Now go the summary page of the ESX host and select correct datastore
Browse the datastore form the .vmx file of the VM
Now locate the VMX file.
Right click on the .vmx file of the VM and choose ‘Add to Inventory’
Go through the wizard and your Virtual Machine should appear online again.
Monday 23 November 2015
Thursday 19 November 2015
How to Reset vi-admin Password on vMA 5
Well, I’ve been here before. Came to use the vMA I have set up in my lab environment earlier, and got the following when trying to log in…

The procedure for resetting the password on vMA 5 is different to earlier versions, so will run through it here. First of all we need to restart the appliance, and change an option on the GRUB bootloader:

Now we need to select the first option “SUSE linux Enterprise Server 11 SP1 for VMware” and press ‘e’ to edit.
Go to the second line, that starts with “kernel /vmlinuz..” and again press ‘e’ to edit. Move to the end of the line and add the following: init=/bin/bash and hit Enter.

Now press ‘b’ to boot the vMA. The vMA will boot and you will be presented with a command prompt.
Reset the vi-admin password, by entering the following command:
# passwd vi-admin

Once done, reboot the vMA. You should now be able to log in!
Wednesday 18 November 2015
VMware vSphere 6.0 vs vSphere 5.x – Difference
What’s New in VMware vSphere 6.0 ?
- VMware vSphere Virtual Volumes. (vvols)
- vSphere Content Library .
- Cross-vCenter Clone and Migration
Let’s see the comparison between VMware vSphere 6.0 and VMware vSphere 5.5 & 5.1 versions.
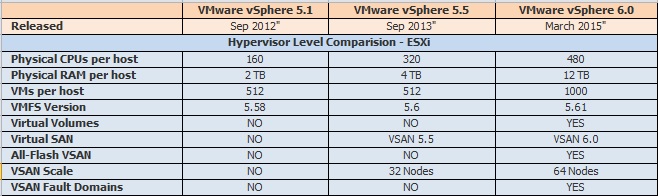
ESXi – Hypervisor Level – Comparison:
Virtual Machine Level Difference:

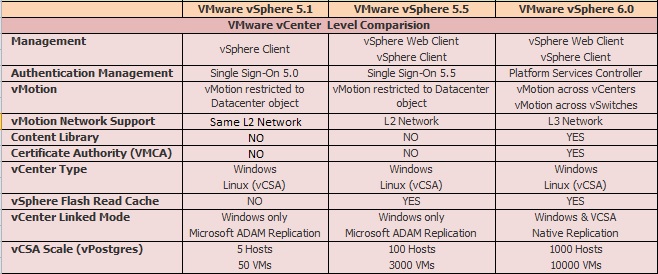
VMware vCenter Level Differences:
Difference between ESX and ESXi
ESX 4.1 is the last version availability of ESX server.
Capability
|
ESX
|
ESXi
|
|---|---|---|
Service Console
|
Present
|
Removed
|
Troubleshooting performed via
|
Service Console
|
ESXi Shell
|
Active Director Authentication
|
Enabled
|
Enabled
|
Secure Syslog
|
Not Supported
|
Supported
|
Management Network
|
Service Console Interface
|
VMKernel Interface
|
Jumbo Frames
|
Supported
|
Supported
|
Hardware Montioring
|
3 rd Party agents installed in Service console
|
Via CIM Providers
|
Boot from SAN
|
Supported in ESX
|
Supported in ESXi
|
Software patches and updates
|
Needed as smilar to linux operation system
|
Few pacthes because of small footprint and more secure
|
vSphere web Access
|
Only experimental
|
Full managenet capability via vSPhere web client
|
Locked Down Mode
|
Not present
|
Present . Lockdown mode prevents remote users to login to the host
|
Scripted Installtion
|
Supported
|
Supported
|
vMA Support
|
Yes
|
Yes
|
Major Administration command-line Command
|
esxcfg-
|
esxcli
|
Rapid deployment via Auto Deploy
|
Not supported
|
Supported
|
Custom Image creation
|
Not supported
|
Supported
|
VMkernel Network Used for
|
vMotion,Fault Tolarance,Stoarge Connectivity
|
Management Network , vMotion, Fault Tolarance, Stoarge Connectivity, ISCSI port binding
|
what's new in vsphere 6 :-
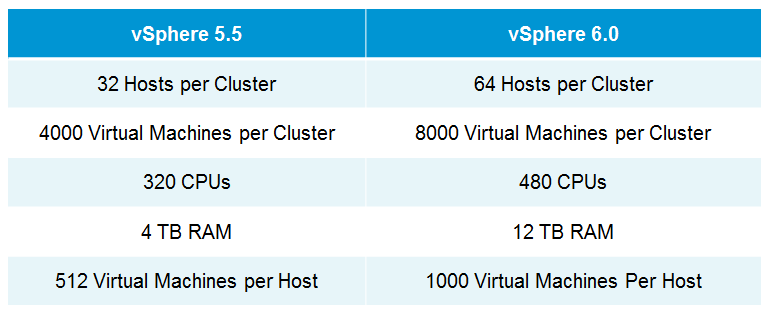
In vSphere 5.5 the maximum supported host memory was 4TB, in vSphere 6 that jumps up to 12TB. In vSphere 5.5 the maximum supported # of logical (physical) CPUs per host was 320 CPUs, in vSphere 6 that increases to 480 CPUs. Finally the maximum number of VMs per host increases from 512 in vSphere 5.5 to 1000 VMs per host in vSphere 6. While this is greatly increased I’m not sure there are many people brave enough to put that many VMs on a single host, imagine the fun of HA having to handle that many when a host fails.


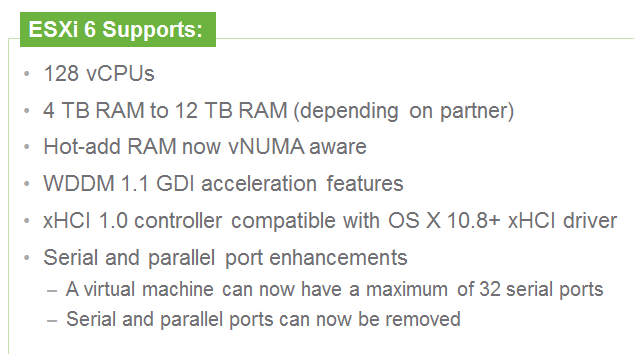
vSphere 6 ESXi and VM enhancements:
- Cluster now supports up to 64 nodes and 8.000 VMs
- VMs now support up to 128 vCPUs and 4 TB vRAM
- Hosts now support up to:
480 pCPUs
12 TB RAM
datastores with 64 TB
1000 VMs
Storage:
- Virtual Volumes (VVol)
- improved Storage IO Control
vSphere Fault Tolerance:
- FT support for up to 4 vCPUs and 64 GB RAM
- new, more scalable technology: fast check-pointing to keep primary and secondary in sync
- continuous availability – zero downtime, zero data loss for infrastructure failures
- FT now supports Snapshots (Backup)
- Storage Fault Tolerance:
primary and secondary VM has its own .vmx & .vmdk files
primary and secondary VM can be placed on different datastores!
vMotion Enhancements:
- vMotion across vCenter Servers
- vMotion across vSwitches
- Long-distance vMotion – now support of local, metro and cross-continental distances (up to 100+ms RTTs)
vCenter Server Appliance:
- the configuration maximums of the vCenter Server Appliance will be extended:
The embedded DB now supports up to 1.000 Hosts and 10.000 powered on VMs (vSphere 5.5: 100 hosts/3000 VMs)
vSphere Web Client:
- long awaited performance improvements are implemented
- but nevertheless a Virtual Infrastructure Client 6.0 (C#) will be still available
Improved vSphere Replication:
- Recover Point Objectives (RPOs) will remain at 15 minutes (was at 5 min in early builds – maybe it will be higher in later releases)
- support for up to 2000 VM replications per vCenter
VMware Virtual SAN (VSAN 6.0)
- new On-Disk Format
- Performance Snapshots – vsanSparse
- usability improvements
- supports Failure Domains (note: failure domains are NOT metro/streched clusters)
- new disk serviceability feature
In vSphere 5.5 the maximum supported host memory was 4TB, in vSphere 6 that jumps up to 12TB. In vSphere 5.5 the maximum supported # of logical (physical) CPUs per host was 320 CPUs, in vSphere 6 that increases to 480 CPUs. Finally the maximum number of VMs per host increases from 512 in vSphere 5.5 to 1000 VMs per host in vSphere 6. While this is greatly increased I’m not sure there are many people brave enough to put that many VMs on a single host, imagine the fun of HA having to handle that many when a host fails.
Monday 16 November 2015
Allocate a static IP address to the VMware vCenter Server Appliance (VCSA) :-
When deploying the VMware vCenter Server Appliance (VCSA) it will default look for a DHCP address. When there is no DHCP server available the following error is displayed:
NO NETWORKING DETECTED.
it is possible to manually configure a static IP address by using the command line. Here are the steps:
/opt/vmware/share/vami/vami_config_net

https://static-ip-address:5480
Sunday 15 November 2015
Increase type delay for slow connections to virtual machine consoles :-
If you access a virtual machine console over a slow connection, you'll encounter keyboard sync issues. Virtualization expert Rick Vanover shows how to configure a value to reduce this frustration.
If you access a virtual machine console over a slow connection, you'll encounter keyboard sync issues. Virtualization expert Rick Vanover shows how to configure a value to reduce this frustration.
This configuration is written into the virtual machine's .VMX file, which details what the virtual machine has configured. The .VMX file is what vCenter Server uses to inventory virtual machines on an ESX(i) host. The line shows up as:
keyboard.typematicMinDelay = "2000000"
You can edit the .VMX files directly, but a better practice is to configure this value within the vSphere Client for a virtual machine template. When you consider that most of the access to a virtual machine is provided by tools such as remote desktop, there is no harm in configuring this value globally for all virtual machines that originate from a template.
VMware Appliance password expire :-
Unlocking a locked out root account
If the root account is not accessible via the console, the secure shell, and the Virtual Appliance Management Interface (VAMI) (vCenter Server Appliance 5.5), the root account has been inactivated due to password expiration. To reactivate the root account, the vCenter Server appliance must be rebooted and the kernel option modified in the GRUB bootloader to obtain a root shell.- Reboot the vCenter Server appliance using the vSphere Client.
- When the GRUB bootloader appears, press the spacebar to disable autoboot.
Note: If the time between when you power on the virtual machine and when it exits the BIOS or EFI and launches the guest operating system is too short, you can adjust the delay. - Type p to access the appliance boot options.
- Enter the GRUB password.
Note:- If the vCenter Server 5.5 appliance was deployed without editing the root password in the Virtual Appliance Management Interface (VAMI), the default GRUB password is
vmware. - If the vCenter Server 5.5 appliance root password was reset using the VAMI, then the GRUB password is the password last set in the VAMI for the root account.
- If the vCenter Server 5.5 appliance was deployed without editing the root password in the Virtual Appliance Management Interface (VAMI), the default GRUB password is
- Use the arrow keys to highlight VMware vCenter Server Appliance and type e to edit the boot commands.
- Scroll to the second line displaying the kernel boot parameters.
- Type e to edit the boot command.
- Append
init=/bin/bashto the kernel boot options. - Press Enter. The GRUB menu reappears.
- Type b to start the boot process. The system boots to a shell.
- Reset the root password by running the
passwd rootcommand. - Restart the appliance by running the
rebootcommand.


Saturday 14 November 2015
“A general system occured: PBM error occurred during PreMigrateCheckCallback: Connection refuse “
I recently received multiple errors with in my home lab when trying to Clone Machines.
“A general system occured: PBM error occurred during PreMigrateCheckCallback: Connection refuse ”
Resolution:
In this case Profile-Drive Storage Service
(I am using the VCSA 6.0)
ssh into the VCSA
Run the following command to check the status sure enough the service was not running
service vmware-sps status
SPS-Service1
To start the service:
service vmware-sps start .
In this case Profile-Drive Storage Service
(I am using the VCSA 6.0)
ssh into the VCSA
Run the following command to check the status sure enough the service was not running
service vmware-sps status
SPS-Service1
To start the service:
service vmware-sps start .
Solve Network Card Not Detected issue for VMWare ESXi 5.5 – DLink 528T and RTL8139DL NICs
Oh by the way, I was using PCI NICs which were:
1. DLink 528T – gigabit NIC
2. RTL8139DL – 10/100 mbps NIC
Now this is what I did to make these two work.
1. DLink 528T – gigabit NIC
2. RTL8139DL – 10/100 mbps NIC
Now this is what I did to make these two work.
Download the following .vib files (according to your needs):
a. Realtek R8168
b. Realtek R8169
c. Realtek R8139
d. Realtek R8168
e. DLink 528T and other .
Download the ESXi customizer tool : ESXi customizer
Now you can install the above files in any two ways.
Pre install (Using the ESXi customizer tool)
Post install (Using SSH Console)
First Method (Using the ESXi customizer tool):
Subscribe to:
Posts (Atom)